Smart Home Cinema for Jellyfin — Installation & Setup Guide
This guide walks you through the shared setup steps for Smart Home Cinema for Jellyfin voice control, then shows you how to finish setting up Voice Assistant Edition or Local Voice Edition.
1. Choose Your Jellyfin Edition
Both Smart Home Cinema for Jellyfin editions control Jellyfin through Smart Home Cinema running on your Windows PC.
The Jellyfin Server setup, TV configuration, Command Center library and Movie List workflow are shared. The difference is how your voice command reaches Smart Home Cinema.
Voice Assistant Edition
Alexa or Google Assistant
→ TRIGGERcmd
→ Smart Home Cinema on your Windows PC
→ Jellyfin Server
→ the Jellyfin app on your selected TV
Use this edition if you want to control Jellyfin through Alexa or Google Assistant.
Local Voice Edition
PC microphone
→ Local Voice Engine
→ Smart Home Cinema on your Windows PC
→ Jellyfin Server
→ the Jellyfin app on your selected TV
Use this edition if you want offline local voice recognition from a microphone connected to your Windows PC.
2. Before You Start
Before setup, make sure you have:
- Windows 10 or Windows 11 PC;
- Jellyfin Server installed and running;
- administrator access to Jellyfin Dashboard;
- Jellyfin app installed and signed in on your TV;
- TV turned on and Jellyfin app open during TV discovery;
- supported or testable Jellyfin TV client;
- a microphone recognized by Windows for Local Voice Edition; for voice control from another room, use a wireless microphone system with a receiver connected to the PC;
- TRIGGERcmd account and Alexa or Google Assistant for Voice Assistant Edition.
For a standard local setup, Jellyfin Server and Smart Home Cinema run on the same Windows PC. If Jellyfin Server runs on a NAS, Linux server, Docker host or another device, read the NAS / SMB section before changing the default SHC media folder.
3. Install the Edition You Want to Use
- Run the installer for the Jellyfin edition you want to use.
- Read and accept the License Agreement.
- Continue through the installer.
- Keep the default fixed installation path.
- On the final page, leave enabled: Launch Smart Home Cinema - Configure Jellyfin TVs.
- Click Finish.
If the installer displays the FFmpeg / ffprobe page, choose Download FFmpeg and ffprobe from the third-party provider (recommended) unless you intentionally want to continue without dynamic Movie List generation. Downloading and preparing the files may take several minutes. Keep Setup open and wait for the process to finish, even if the window appears inactive.
The Jellyfin TV configurator opens automatically after installation when that final option is enabled.
You can also open it later from the Windows Start Menu:
Smart Home Cinema - Configure Jellyfin TVsEach Jellyfin edition uses its own fixed installation folder:
Voice Assistant Edition
C:\Program Files\Smart Home Cinema (Jellyfin Edition)Local Voice Edition
C:\Program Files\Smart Home Cinema (Jellyfin Local Voice Edition)4. Create a Dedicated Jellyfin API Key
Smart Home Cinema needs an API key to communicate with your Jellyfin Server. This applies whether your Jellyfin setup is new or you have already been using Jellyfin for a long time.
Create a dedicated API key for Smart Home Cinema instead of reusing a key assigned to another application. If you are reinstalling Smart Home Cinema and already have a dedicated Smart Home Cinema API key, you can reuse it.
- Open Jellyfin in your browser.
- Sign in with an administrator account.
- Open Jellyfin Dashboard.
- Under Advanced, open API Keys.
- Click New API Key.
- Use a recognizable name, such as: Smart Home Cinema.
- Copy the generated API key.
- Keep it private.
- Enter this key in the API Key field of the Smart Home Cinema Jellyfin TV configurator.
5. Choose the SHC Media Folder
Standard local setup
C:\ProgramData\SHC\Jellyfin\CommandCenter- keep the default value;
- installer creates the folder automatically;
- it stores Command Center assets and the dynamically generated Movie List video.
NAS or separate Jellyfin Server
- do not change the folder casually;
- use a writable SMB folder only if your setup requires it;
- read the detailed NAS / SMB section before saving.
Important: Smart Home Cinema and Jellyfin must access the same physical Command Center folder. The visible paths may be different, but the underlying files must be the same.
6. Configure Jellyfin Server and Your TVs
Open Smart Home Cinema - Configure Jellyfin TVs.
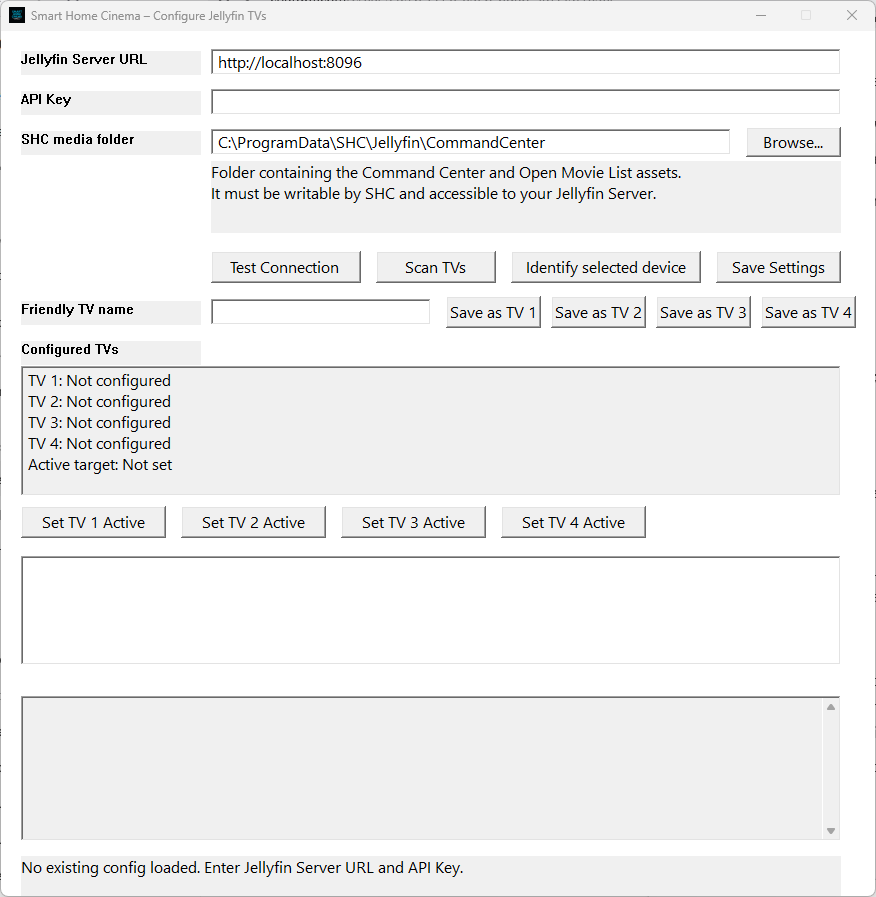
The configurator uses three main fields:
- Jellyfin Server URL - the address of your Jellyfin Server;
- API Key - the key you created in Jellyfin Dashboard;
- SHC media folder - the folder used for Command Center assets and Movie List output.
If Jellyfin Server runs on the same Windows PC as Smart Home Cinema and you kept Jellyfin's default HTTP port, use:
http://localhost:8096If Jellyfin Server runs on another device in your network, use its local network address and configured port, for example:
http://192.168.1.50:8096- Test Connection
Checks the server URL and API key. Run this first. - Scan TVs
Searches for active Jellyfin client sessions. Before scanning, turn on the TV, open Jellyfin app, and make sure it is signed in and connected. - Select a discovered device.
- Identify selected device
Sends an identification message to the selected TV. - Friendly TV name
Optional friendly label. - Save as TV 1 / TV 2 / TV 3 / TV 4
Stores up to four TVs. - Set TV 1 Active / Set TV 2 Active / Set TV 3 Active / Set TV 4 Active
Chooses the current target. - Save Settings
Up to four TVs can be saved, but only one TV is active at a time.
Later, the active TV can be changed by voice:
Use TV One
Use TV Two
Use TV Three
Use TV Four
7. Add the Smart Home Cinema Command Center Library in Jellyfin
This step is required.
Create a dedicated Jellyfin library named exactly:
Smart Home Cinema Command CenterFor the standard local setup, use this folder:
C:\ProgramData\SHC\Jellyfin\CommandCenterSmart Home Cinema creates and populates this folder automatically. It contains the Command Center assets and the generated Movie List video.
You do not need to copy these files manually. In Jellyfin, create a dedicated library that indexes this same folder.
- Open Jellyfin Dashboard.
- Open the Libraries section.
- Choose Add Media Library.
- For Content type, select Home Videos and Photos.
- Set the Display name exactly: Smart Home Cinema Command Center.
- Add the selected SHC media folder.
- Leave Display the photos enabled.
- Save.
- Run a Jellyfin library scan.
Do not choose Movies. The Command Center folder contains both PNG images and MP4 videos. Home Videos and Photos allows Jellyfin to index both formats in the same library.
The folder indexed by Jellyfin must refer to the same physical folder selected in SHC media folder. If they do not match, Jellyfin may display an outdated Movie List or an older Command Center asset.
8. Create the Smart Home Cinema Playlist
Create a Jellyfin playlist named exactly:
Smart Home Cinema Playlist- add movies or episodes;
- first 20 items become numbered slots;
- playlist order determines slot numbers;
- Movie List updates automatically when the playlist changes;
- you do not need to run Update Libraries only to refresh Movie List.
Useful commands:
Open Movie List
Play Movie One
Play Movie Seven
Play Movie Twenty
Empty Playlist
Open Movie List shows the numbered overview. You can also say Play Movie Seven directly without opening Movie List first.
Empty Playlist removes items from Smart Home Cinema Playlist only. It does not delete movies or episodes from Jellyfin library.
9. Optional — Create the Smart Home Cinema Collection
You can also create an optional collection named exactly:
Smart Home Cinema CollectionThis is useful as a larger curated shortlist or watch pool when your Jellyfin library is large.
Smart Home Cinema Collection
Optional larger curated shortlist.
Smart Home Cinema Playlist
Active numbered Movie List with up to 20 items.
10. Finish Voice Assistant Edition Setup
Only follow this section for Voice Assistant Edition.
TRIGGERcmd Free plan limitation
You can complete the setup and test Voice Assistant Edition with a free TRIGGERcmd account. However, TRIGGERcmd Free is limited to one executed command per minute.
For unrestricted day-to-day Jellyfin voice control, especially when you want to send several commands in succession, a TRIGGERcmd subscription is recommended.
TRIGGERcmd is a third-party service with its own pricing and plan conditions. Smart Home Cinema does not charge a recurring subscription. Check current TRIGGERcmd pricing.
Smart Home Cinema installs a prepared Jellyfin TRIGGERcmd command template, but the installer does not replace your live TRIGGERcmd configuration automatically. Choose the correct import method below for your current TRIGGERcmd setup.
Template source:
C:\Program Files\Smart Home Cinema (Jellyfin Edition)\Docs\commands.jsonLive TRIGGERcmd file:
C:\Users\<YOUR_WINDOWS_USERNAME>\.TRIGGERcmdData\commands.jsonImportant for existing TRIGGERcmd users: If you already use TRIGGERcmd for other automations, do not replace your live commands.json file with the Jellyfin template. Doing so would remove your existing active commands.
Before editing your live commands.json file, stop TRIGGERcmd Agent. Then follow the existing-user safe merge instructions to add the Jellyfin commands without losing your current configuration. After saving the merged file, start TRIGGERcmd Agent again and open Command Editor to confirm that the Jellyfin commands are visible.
Fresh TRIGGERcmd Installation
If you have just installed TRIGGERcmd and do not have personal commands that you need to preserve, use these steps:
- Stop TRIGGERcmd Agent.
- Copy Jellyfin template over live commands.json.
- Start TRIGGERcmd Agent again.
- Open Command Editor and confirm the Jellyfin commands are visible.
Need help with the shared voice-assistant setup?
- Alexa usually uses turn on before a raw TRIGGERcmd command unless you create routines.
- Alexa routines allow more natural phrases.
- For Google Assistant, routines are strongly recommended and may be necessary for reliable recognition of all commands.
- If new Google Assistant commands do not appear, sync devices or relink TRIGGERcmd as explained in the linked guide.
11. Finish Local Voice Edition Setup
Only follow this section for Local Voice Edition.
Local Voice Edition uses a microphone connected to your Windows PC and local offline voice recognition. The app runs from the Windows System Tray and uses Sleeping Mode, Command Mode and the optional Start with Windows setting.
First start: Launch the Jellyfin Local Voice Edition app from the Windows Start Menu. The app appears in the Windows System Tray and starts in Microphone Off / OFF Mode. Right-click the tray icon and choose Start Sleeping Mode. Then say Smart Cinema Wake Up to enter Command Mode.
For a detailed explanation of Microphone Off / OFF Mode, Sleeping Mode, Command Mode and Start with Windows, read the Local Voice states section in the classic VLC / PotPlayer Local Voice Edition guide. These modes and System Tray controls work the same way in Jellyfin Local Voice Edition.
Using Local Voice from another room: Local Voice Edition listens through a microphone recognized by your Windows PC, not through the TV. A simple microphone is suitable when you speak in the room where the PC is located. To speak commands from another room, use a wireless microphone system with a receiver connected to the PC. Effective range depends on the microphone system and your home.
This lets you control the currently active TV from another room. It does not create independent simultaneous playback zones.
For normal commands, say:
Smart Cinema
→ brief pause
→ command
Example:
Smart Cinema
→ brief pause
→ Play Movie Seven
Wake Up
Smart Cinema Wake Up
Smart Cinema Start Listening
Go to Sleep
Smart Cinema Go To Sleep
Smart Cinema Stop Listening
Smart Cinema Sleeping Mode
Status
Smart Cinema StatusRecommended Local Voice Alternatives
The standard commands shown in the Command Center remain available. Local Voice Edition also includes the alternatives below, which may be easier for offline voice recognition to understand reliably.
After saying Smart Cinema and pausing briefly, you can use either the standard command or its recommended Local Voice alternative:
Mute Movie → Sound Off
Unmute Movie → Sound On
Forward 30 Seconds → Skip Ahead 30 Seconds
Forward 1 / 2 / 5 / 10 Minutes → Skip Ahead 1 / 2 / 5 / 10 Minutes
12. Optional — Use a NAS or SMB Share
Use this only if your Jellyfin Server setup requires network storage. The default local folder is recommended when Jellyfin Server and Smart Home Cinema run on the same Windows PC.
- Create a dedicated writable shared folder.
- Grant the Windows account Read / Write or Modify permissions.
- Confirm Windows can create, edit and delete a test file in that folder.
- Choose the SMB path in SHC media folder.
- Make sure Jellyfin indexes the same physical folder.
Windows SHC path:
\\NAS\SHC_CommandCenterJellyfin Linux / Docker path:
/media/shc-command-centerThese paths may look different but must refer to the same physical network folder.
13. Run Your First Tests
- Show Commands
- Open Movie List
- Add one movie or episode to Smart Home Cinema Playlist
- Open Movie List again and verify the generated slot
- Play Movie One
- Pause Movie
- Resume Movie
- Forward One Minute
- Rewind Thirty Seconds
- Stop Movie
- Use TV Two, if a second TV is configured
You do not need Update Libraries only to refresh Movie List after changing the playlist.
For Voice Assistant Edition, test through Alexa or Google Assistant.
For Local Voice Edition, test wake-up, Smart Cinema plus a brief pause plus command, status and sleep.
14. TV Compatibility and the 14-Day Trial
Capabilities depend on the Jellyfin TV client. The main validated platforms are LG webOS, Samsung Tizen, Android TV / Google TV and Amazon Fire TV / Fire OS.
Roku is not supported in the current architecture. Use the free trial to validate your own server, TV client and voice-control method.
View Jellyfin Voice Commands and TV Compatibility →
15. Troubleshooting
Test Connection Fails
- Check the Jellyfin Server URL.
- Confirm Jellyfin Server is running.
- Confirm the API key was copied correctly.
- If the server is on another device, confirm that the Windows PC can reach it on the network.
Scan TVs Finds No Devices
- Turn on the TV.
- Open the Jellyfin app on the TV.
- Make sure the TV app is signed in and connected to your Jellyfin Server.
- Try playing or opening an item in the Jellyfin app, then scan again.
Identify Selected Device Does Not Show a Message
- Confirm the correct device is selected.
- Confirm the Jellyfin app is visible on the TV.
- Scan again if the device list is old.
Open Movie List Shows an Old or Incorrect List
- Confirm the Smart Home Cinema Playlist contains the expected items.
- Confirm Jellyfin indexes the same SHC media folder selected in the configurator.
- Confirm the Command Center library scan has completed.
TRIGGERcmd Commands Do Not Appear
- Confirm that the Jellyfin commands were added to the live TRIGGERcmd commands.json file using the correct method for your setup. Existing TRIGGERcmd users must use the existing-user safe merge instructions instead of replacing the live file.
- Restart TRIGGERcmd Agent.
- Open Command Editor again and refresh if needed.
Local Voice Does Not React
- Confirm the microphone is connected and recognized by Windows.
- If the tray icon is not visible, launch the Jellyfin Local Voice Edition app from the Windows Start Menu.
- If the tray icon shows Microphone Off / OFF Mode, right-click the tray icon and choose Start Sleeping Mode.
- Say Smart Cinema Wake Up before normal commands.
- For normal commands, say Smart Cinema, pause briefly, then say the command.
NAS or Network Folder Does Not Work
- Confirm the SMB path is reachable from Windows.
- Confirm the Windows account can create, edit and delete a test file.
- Confirm Jellyfin indexes the same physical folder.
FFmpeg Download or Extraction Is Still Running
- Wait for the download and extraction process to finish.
- Do not close the installer while it is preparing FFmpeg or ffprobe.
- If setup was interrupted, run the installer again.
16. Trial, Licensing and Uninstall
Smart Home Cinema includes a 14-day free trial. The trial begins when Smart Home Cinema runs for the first time.
Use the trial to test your own Jellyfin Server, TV client and voice-control method. After expiry, activate a license.
To remove Smart Home Cinema, uninstall it through Windows Settings. Some configuration, runtime and licensing data may remain preserved for reinstall or update operations.
17. Final Setup Checklist
Common setup
- Jellyfin Server running
- Jellyfin app open on TV
- API key created
- Test Connection passed
- TV detected and saved
- one TV active
- Command Center library created
- same physical SHC media folder indexed
- Smart Home Cinema Playlist created
- Open Movie List tested
- Play Movie One tested
Voice Assistant Edition
- TRIGGERcmd Agent installed
- Jellyfin commands.json imported
- Alexa or Google Assistant linked
- routines configured if needed
- command tested
Local Voice Edition
- microphone recognized by Windows
- Local Voice app launched
- tray icon visible
- Start Sleeping Mode selected
- wake-up tested
- Smart Cinema activation phrase tested
- status tested
- sleep tested
- Start with Windows reviewed